Thursday, April 26, 2012

Every day I'm pickling.....

Kudos to those of you who get the title reference.

Anyways, before we had kids and when we lived in Central NY, hubby and I had a garden and we used to love to grow and can and pickle foods.  We did all kinds of peppers, pickles, and our favorite: dilly beans.  We haven't had much luck growing things here in TX, mainly because we are gone for most of the summer.  But when we went strawberry picking a few weeks ago, they had some great produce at their farm market, so we picked up a few tiny pickling cucumbers to make some pickles (which Charlotte loves).


I used goodies from a few of my recent Scrapbook Circle kits.  I am starting to finally dig into them because I am all caught up with some of my assignments.  There was a sketch challenge on the SBC blog with an awesome sketch by Diana, so I had to play along!  Here is the sketch:


I stuck to a green and tan color palette and added a few more photos than the sketch called for (and you can see that I rotated it, too).  I love that bright green Amy Tan paper that I used for the large banner and the green foam letters, too! PLUS I finally got to put some of those mason jar papers to work, too!


Because it was a food themed layout, I felt I had to use some baker's twine, so I strung some on and stitched over it in some parts.

It feels so good to dig into my kits and do some pages for me!  :)

Wednesday, April 25, 2012

Doodling like Amy Tan at Birds of a Feather..

So this month's kit at Birds of a Feather has AWESOME papers by Amy Tan (Sketchbook), and the Pink Paislee Christy Tomlinson She Art line.  I just LOVE both of these collections and they work just perfectly together because they both have the "artsy" look to them.  The bright colors inspired me to use photos from outside.

This first page I did a LOT of fussy cutting, so I kept all my other elements to a minimum.  Charlotte pedals her little tricycle so fast that sometimes her feet slip off the pedals and she can get them back on they are spinning so fast!  :)  But then other times it takes us an hour to walk around the block cause she has to pick up every leaf....anyways....


I fussy cut a lot of the "doodled" elements from the Amy Tan papers, and I also took some inspiration from AT and did a light watercolor wash on the background.  I didn't have any water color paint, so I just used watered down mists.  The only thing about using water on your papers is that it makes them buckle so, and this page would NOT stay flat when I tried to photograph it.

This 2nd page is really special to me.  Here it is:


And here is why it is special:


This 2nd layout I did just about 2 years ago when Charlotte started pulling herself up in the stroller and just letting the wind blow through her hair and taking it all in.  Well when we were out walking the other night, I looked down and had deja vu.  It was just perfect and I snapped the photo of Kyler in the same exact position.  So I scraplifted myself and did this page!


The Amy Tan papers have some great doodles on them, so I decided that I would try and mimic some of the doodles and use them on my pages.  The tag that come in the kit has a doodle that looks like a bike tire with spokes.

I simply drew 2 circles slightly off centered from each other


then drew lines starting from the middle and going past the edges


and continuing until I had this look!  I cut these out and added them to my page.


I also doodled some of the little 5 line "stars" by drawing 5 lines and then adding a little "knob" at the end and making the line thinner as I went back to the center.


Lastly, I didn't use this on  these two pages, but it is very easy to doodle the scalloped border that is on many of the patterned papers in this line.


I also added some dots and some little hearts!  I loved experimenting with doodling on my pages!


Monday, April 23, 2012

Playing with Glitz New Releases!

Hello everyone! I'm here to share some of my first pages with the new releases!

When I saw the peak of the Happy Travels collection, it was a few weeks after I had just gotten home from a trip that I will never forget...because it was a nightmare!!  My 2 1/2 year old was living up to all the sterotypes of a "terrible two" and it was just an awful awful time traveling.  So I had to journal about it (although I'd much rather forget it!).  Hopefully I can look back at this one day and laugh!  :)

(My alternative title for this layout was "The Trip From Hell:)

This was the only photo that I got while traveling and it was in the Detroit airport.  The hustle and bustle and the colors and the blur of the photo just emulate the hectic time that we were having.


I hand cut some planes from the Planes paper and strung them like a banner.  I first stitched lines underneath them.  I was thinking about how when you see a flight path on a map, you see those dotted lines from point A to point B, so that's what inspired me to stitch under the plane banner.  I also punched some cloud shapes from vellum and the patterned paper and layered them on.  I wanted some to pop off the page, so I had to get creative with that because a pop dot would show through the vellum.  So I just lightly glued one of the vellum clouds to the back of an airplane.


This next page I create based on the April blog challenge.


We had just taken a trip to the park where we saw a butterfly and Charlotte chased it around the field.  It was perfect for this challenge!


I loved the pink and blues and flowers and butterflies, so I incorporated those all into my page.
The layered banner sticker originally had a bird on it, but I took it off and replaced it with a small blue butterfly.


It is a bit hard to tell in the photos, but I took some acetate and cut out some small circles and inked the edges with brown StazOn.   I glued these circles over where the butterfly is in the photos to make them stand out a bit more.  One of the spiral roses is from a Spellbinders Die and the others I cut and rolled myself.


Hope you are inspired by this beautiful spring challenge!!

Happy Are They Who Travel Without Kids

Happy Travels Planes
Happy Travels Polka
Happy Travels Bicycle
Happy Travels Stripe
Happy Travels Epoxy Stickers
Happy Travels Title Stickers
Vintage Blue Stripes
Vintage Blue Epoxy Stickers
Vintage Blue teeny Alphas
Dance In the Sunshine Whatnots

Butterfly Chase


French Kiss Fleur
Pretty In Pink Pink Roses
Pretty In Pink Music
Pretty In Pink Peek A Boos
Pretty In Pink Journaling Stickers
Pretty In Pink Layered Stickers
Happy Travels Stripe
Happy Travels Floral
Happy Travels Bicycle
Other: American Crafts alpha stickers

Saturday, April 21, 2012

Blogiversary Blog Hop!!!!!

Diana Fisher is celebrating her 3 year blog anniversary by giving the anniversary gifts to YOU — the readers! Hop on through the Blog Hop to find prizes and inspiration along the way. 

Plus, there's a chance to play along with us! Use the sketch Diana made, link your entry back at her blog, and you could win a $30 shop credit to Scrapbook Circle. 

I am so excited to be a part of this wonderful Blog Hop!   I first "met" Diana through Sketchy Thursdays a few years ago.  We have served on a few teams together and I have always adored her work.

As many of you know, Sketchy Thursdays closed down earlier this year, and I miss it dearly.  But Diana's sketches are still appearing here and there and it felt so good to work with one of her sketches again!  Here is the sketch that she has created for this hop.


I immediately knew what photos I was going to use because I have had them sitting on my desk for a while now.  I had a hard hard time finding papers to go with these photos because of the colors in the photos (dark hunter green and sunshine yellow???  ugh).  Anyways, I finally decided on the light teals, greens and yellows of the Crate Paper Pretty Party collection.


I had one extra photo than the sketch called for, but I fit it in.  I also played around with the size and arrangement of the triangles for a LONG time until I got what I wanted.  I like how the triangles help your eyes move to the photos.

You have until April 30th to complete the hop and link up your sketch challenge entry to be eligible for the hop prizes!  There are many other prizes to be won, too, so please check out all the blogs and then finish up at Diana's.

Corrie Jones {http://corejones.blogspot.com/}
Audrey Yeager {
http://audreysreflection.blogspot.com/}
Antonia Krajicek {
http://www.greenhornedunicorn.com/}
Shannon Bogan {
http://agirlcalledchicken.blogspot.com/}
Lisa Swift {
http://lisarukinswift.blogspot.com/}
Julie Tucker-Wolek {
http://thetuckerwolekclan.blogspot.com/}
Jennifer Ingle {
http://justjingle.blogspot.com/}
Tessa Buys {
http://precociouspaper.blogspot.com/}
Ashley Horton {
http://ashleyspaperdoll.blogspot.com/}
Sara Zenger {
http://sarazenger.blogspot.com/}


And just for stopping by today, I have a GIVEAWAY to one lucky follower!!!  I have a whole bunch of the NEW Amy Tan papers to giveaway (from the Sketchbook collection).  Stay tuned for a photo, but in the meantime, please just leave a comment and I will choose a winner on April 30th!  Thanks for stopping by!

Friday, April 20, 2012

10 Painting Techniques to try on your projects

I haven't done a tutorial in a while, and I have had this one in my head for a long time.  I finally had some time this week to sit down and play with some paints!

This tutorial will show you 10 different ways to use paint on your projects.  I have some examples for some of the techniques.  Some of the pages are older, and some are newer, but they all use paint!

I cut up a few sheets of white cardstock into 3x4" cards and just played around with the paint so that you can see what it looks like without the addition of papers and embellishments. I chose a blue paint so that you could see a good contrast against the white paper. This is just the cheap acrylic paint that you can buy at your local craft store in the small bottles.

1. Finger Painting


The most convenient tool is to just use your fingers!  You can get some broad streaks of paint and you can keep adding layer upon layer.  Or, if you want less paint, just dab your finger on a paper towel before hitting the page.  I used the paint as is without any water added to it. The only drawback is that it is messy.  Or is that a bonus?  :)

Here is an older layout, aptly titled "Finger Foods" where I smeared some paint on under the title to make is stand out more.  I used my finger for this page because of the theme, of course!


2. Tapping a brush


My favorite brush for doing this technique is a fan brush.  I find it gives nice little drops instead of big clumpy ones.  I do sometimes add a tiny tiny bit of water to the paint to make it drip easier.  This is a technique that I use a LOT on my pages.

Just a few taps here and there on this page:


3. Brush Drips


Similar to the tapping, except I make the paint real watery and just let it drip from a regular brush.  You get much larger drops this way.  Most times I will hold the brush perpendicular to the paper and move it up and down a bit to get a drop to come off the bottom of the brush.  Other times I will "fling" the brush.  I like doing the "flinging" when I am trying to show movement on a page.

On this page, I flung my black ink across the page to help your eye move around the page (one of my favorite pages ever!)


4. Credit Card


Simply take a card, slide it through some paint, and then drag it sideways and then down your paper.  Honestly, I didn't really use a credit card...I just used a think sheet of scrap paper.  You definitely need a thick sheet of paper for this, though.  If you do use a credit card, make sure it is expired first!  :)

On the page below, I used a light blue paint on the background in some spots.


5. Watery Drips


I don't know any other nice term for this.  All I did was REALLY water down my paint.  On the card on the right, I stroked the brush across the page and then stood it up to let the paint drip down.  I went over the line a few times with more watery paint each time, and the drips continued down the page.  I did tap the paper a bit to get them to go down faster.  On the card on the left, I just dabbed the brush instead of doing a line.

Confession: I have never used this technique on a page before!  But I'm gonna very soon!

6. Drizzle


This is the technique that I spent the most time experimenting with.  I knew the look I wanted to achieve, and a few ideas of how to do it, but it took a while to get it close to what I wanted and it still isn't perfect.  I first tried filling a baggie with a bit of paint and then poking a small hole with a needle.  I squeezed the baggie and imagined a nice stream of paint coming out as a moved the bag back and forth across my page (kinda like when you drizzle chocolate on desserts).  It didn't work.  I got big clumps of paint, and what drizzle lines I did get were way too thick.  I tried this several times with no luck.

So then I moved on to trying to squirt the paint with a container. I first used an empty liquid adhesive bottle.  It worked OK, but the lines were too thick.  So I tried to find a squeeze bottle with a tiny tiny opening, and low and behold I had an almost empty bottle of Stickles!!!  I was able to open the Stickles container, wash it out, fill it with paint, and it worked!  It wasn't exactly how I envisioned, but it is pretty close!

I have yet to try this technique, too...until I get it exactly how I want it!

7. Fork


I love this technique!  I just added a glob of paint to my mat, stuck the BACK of the fork tines in it, and drug the back of the fork across the page.  I then repeated this in a perpendicular direction to create a cross hatch effect.  I did have to go over the lines a few times, but I love the way it looks!


I used a fork and white paint on my page about a spoon, ironically....

8. Saran Wrap


I learned this technique years ago when I did a faux finish painting on the walls of my living room (which I learned at Home Depot!).  I had never tried it on paper before, but love the way it looks!  Simply wad up a piece of saran wrap, dab it in some paint, blot it a little, and then dab on your page!  And you can just throw it away when you are done!

I just did this page this week and used both the Saran Wrap and the Straw technique.
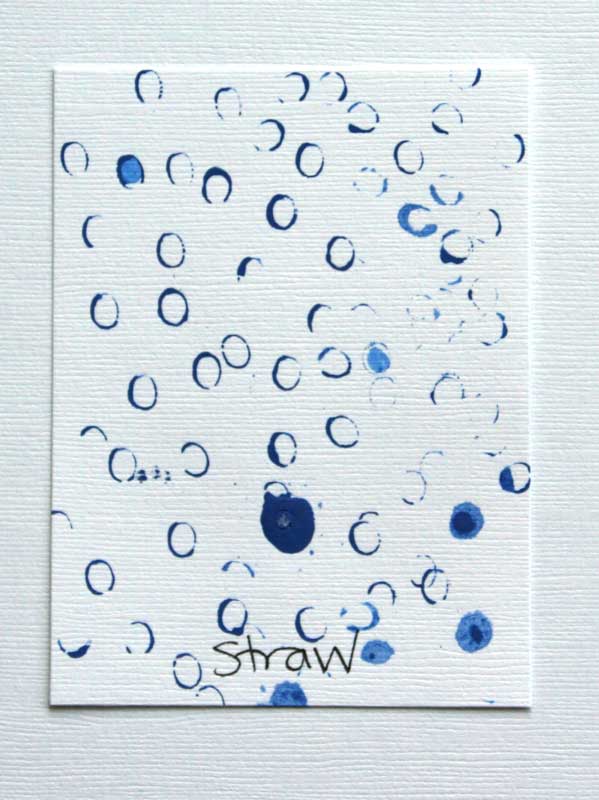


9. Straw


I have to admit that my original plan was to try and "blow" paint onto my page, but it didn't work.  Maybe if I used a smaller straw like a coffee stirrer, but all I had were regular soda straws.  Anyways, just dab the end in some paint and you can create little circles on your page.  I have used things like toilet paper tubes and such to create larger circles, but I am rally diggin' these small circles.

10. A plain ol' brush


And last but not least,  just using a plain old brush can provide a nice look, too!  The thick line at the top is a thick brush to make thicker strokes, and the strokes underneath that are from lightly dragging a fan brush across the page with a watered down paint.

I love using bright colors on dark backgrounds....


I hope that you have found some of these techniques useful.  My best advice is to just break out some small scraps of white cardstock and PLAY!  I had so much fun putting this together and playing with my paints.  I am looking forward to using some more of these techniques on my pages!

Here is an image of all the techniques together so that you can have it for easy reference!  ENJOY!


Thursday, April 19, 2012

A mini for mother...and lot of other happenin's

When I saw the piece of Prima Almanac paper with the cards on it in this months Birds of a Feather kit, I immediately knew that I was going to use them to make a mini album.  I thought black and white photos would go just beautifully with these papers.  And seeing as how I used this kit to make some Mother’s Day Cards, I decided to make a little gift for my mom, too…a mini album of some of my favorite photos of the kids over the past 9 months.


Photobucket


Photobucket


Here is the paper that I used for the cards inside:


I cut out the 12 cards and glued them front to back to make 6 pages.  On each page a add a tab with a word cut from patterned paper. For the covers, I simple used two pieces of chipboard and covered them with the flocked paper on the outside and splattered with white paint.  I punched one small hold in the middle of the left edge and threaded a piece of twine with a little “give” to allow for the pages to open up.  I then glued the black velvet ribbon around the album spine and added some length so it could wrap back around the front.  I added some magnetic closures to help the ribbon stay closed.  I die cut a doily shape from patterned paper and fussy cut the butterfly from one of the papers.

Photobucket

Photobucket


Photobucket


Photobucket


On each page I simply put a photo of the kids and added some punched flowers and a few other embellishments here and there.  I forgot to do this before I photographed, but I do want to add the dates to each page.  The photos are in chronological order.  A simple, yet sweet album that I know my mom will love!

COMING UP:


There is a LOT going on the next couple of weeks!

Fri 4/22-Stay tuned for a tutorial by me that I think you will love!  I’ve had it in my head for a while, and now it’s time to get it out!  A link will be on the Practical Scrappers blog, too!

Sat 4/21-You don’t want to miss this blog hop event!  We are celebrating Diana Fisher’sBlogiversary (she founded Sketchy Thursdays).  TONS of prizes and inspiration!!!!!

4/27-4/29- The BEST online crop anywhere, ever, at CocoaDaisy (oh and someone might be celebrating a birthday that weekend, too!)


5/4-5/6- Birds of a Feather online crop for National Scrapbook Day!

5/8-5/13-Memorable Seasons Online Crop to celebrate National Scrapbook Month!

Seriously…there is a LOT going on!  J I have at least 6 post scheduled for the next 2 weeks, so come back soon!